Studio Design
ICG has consulted with literally hundreds of clubs, from budget operators to award-winning facilities, on how to maximize their investment in video with our product teams, Master Trainers, graphic designers and audio visual experts have found solutions for all our clients’ expectations, operational requirements and budgets. Though every studio is different, we have created a strong guideline as a “change management exercise” to maximize your space and establish the experience of greatest immersion.

Lighting
Your footage will be brighter and more engaging the darker your
environment. Make sure your instructor or staff member has full control
over the lights. If the space is near windows, you would be
advised to limit sun exposure completely or as much as possible.

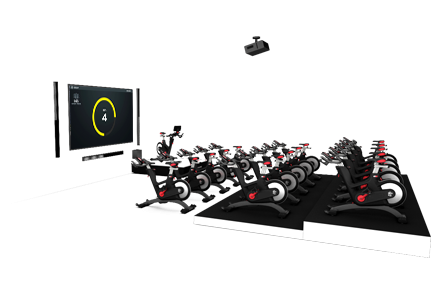
Screen Size
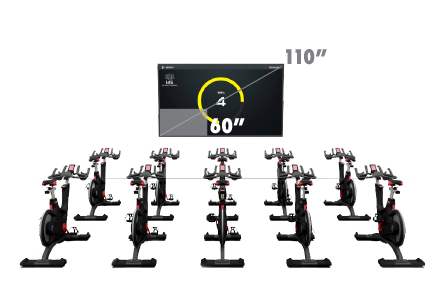
Bigger is better. Virtual coaching and forward-motion footage create greater immersion (the sense that it’s real) when the screen is larger.
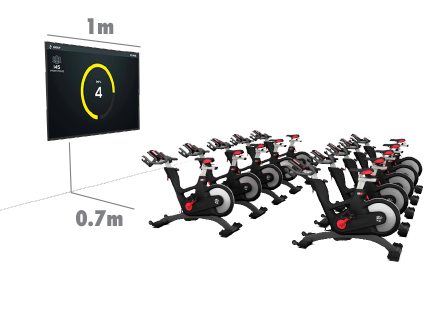
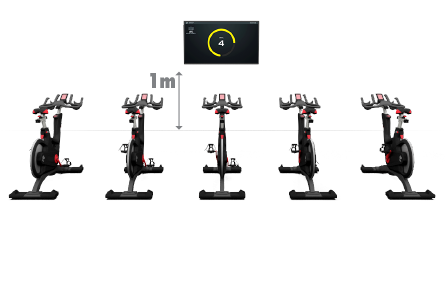
Screen to Bike Distance
With the projector screen or TV you choose, it is important that the front row of bikes are not too close. Our approximate guide is: for every 1.0 meter (3.25 feet) of screen width, the front row of bikes is 0.7 meters (2.25 feet) back. For example, 3.0m (10-ft) screen = 2.1 m (6.75 ft) front row distance. The final size of the screen and its distance to the front row of bikes is your preference.
Screen to floor distance (projector or video wall)
When installing a bigger screen, typically for a larger studio or a gym floor space, it is important not to start the screen at floor level or raise it too high. Our approximate guide is: A 2- to 4+-meter (6.5- to 13-foot) screen (horizontal width) should be placed so that the bottom of the screen is 1 to 1.5 meters (3.25 to 5 feet) from floor level.
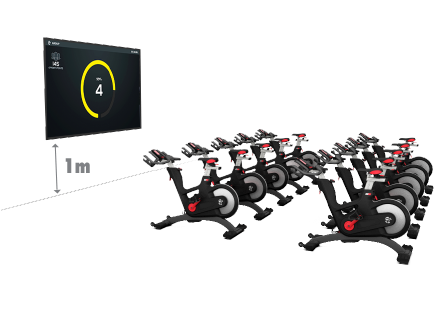
Screen to floor distance (tv, one row of bikes)
When installing a smaller screen for a smaller studio or a gym floor space, it is important not to install the screen too high. Our approximate guide is to place the bottom of the screen 1.5 to 2.0 meters (5 to 6.5 feet) from floor level for any size TV (60” standard). Please be sure to mount the TV at a downward angle for a better viewing experience.
Screen to Floor Distance (TV, Multiple Rows of Bikes)

When installing a smaller screen for a smaller studio or a gym floor space, it is important not to install the screen too high. Our approximate guide is to place the bottom of the screen 1.5 to 2.0 meters (5 to 6.5 feet) from floor level for any size TV (60” standard). Please be sure to mount the TV at a downward angle for a better viewing experience.
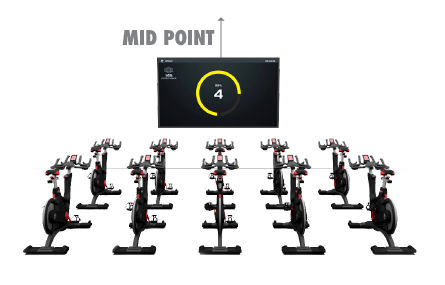
Screen in center of bikes
For all installations (Virtual or Live coaching programs), the screen should be placed in the center (mid-point) of the viewing area, or as close to it as possible, taking into consideration the overall width of the space and the placement of the instructor during Live coaching.
Ceiling Height & Your Projector
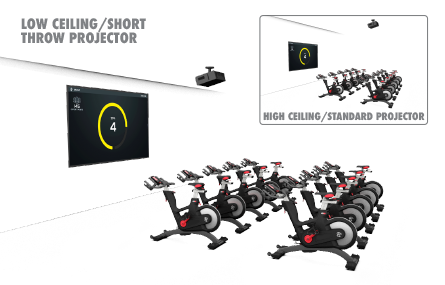
Lower ceiling heights will affect buying decisions for projectors and screens. If the ceiling height is too low, it might not be possible to achieve a larger projected image without riders from the front rows of bikes casting shadows on the screen. To avoid shadows, the screen should be made smaller by bringing the projector closer to, and slightly above, the front row of bikes, as opposed to behind them. An alternative is getting a stronger performance short-throw projector.
Managing Mirrors
Mirrors and footage do not mix well. If a screen is dropped in front of mirrors, the participants at the far sides of the studio tend to see the class’s reflection, as well as the video content. When this happens, the illusion of traveling forward can be distorted. Our recommendation is to remove all mirrors or make sure the video is screened on the opposite wall. If the space in question is a multi-purpose group exercise studio, then the mirrors are more essential and a pull-down screen should be selected, leaving the mirrors as they are.

Instructor, Stereo & Tablet Placement
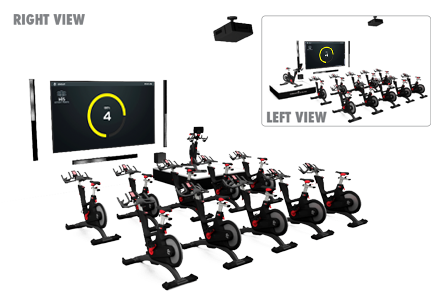
Unlike traditional classes, a live coaching class will require
the instructor, the stereo controls, and the Tablet to be on
the right or left side of the studio/space, so that the screen
takes center stage.
Please note if your HDMI connection exceeds the
maximum length of 10 metres you may experience interference or image
loss. For distances over 10 metres we recommend implementing a cat5
conversion.
Premium Theatre Style Studios
Studios that have tiered floor levels rising in height from the front to the back are known as theatre-style. If you are installing in this type of studio, additional consideration must be given to points 3b, 3c and 3d.
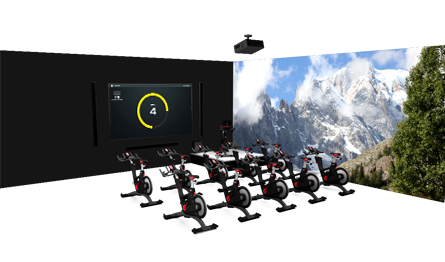
Wall Design
We advise that the wall housing the screen remains a solid color like black, grey or white to ensure that the footage attracts the viewer’s full attention. Many of our premium installations have extended the theme of outdoor participation by applying stunning location vistas on the other walls. This can be done using pictures or a full wallpaper print. ICG can provide amazing high-resolution imagery for application by your chosen supplier.